Designing a Specialized 3D-Printed Homelab for a Calm Life
June 18, 2026
After a few years of experience, crystallization, and yearning, followed by about a month of implementation, it’s ready. My Homelab is "done" (they never really are). I thought it would be productive to break down what I built, why I made various hardware decisions, and what the point of this project was. To start, it is important to clarify that I do not work on anything because it is interesting or because it would look good on a resume. A project has to provide immediate utility to me or to the people who matter to me in order for me to feel any sense of motivation. Furthermore, this is my career as well as my hobby – I need not do projects purely for the purpose of learning. With that out of the way, do note that this article is concerned only with hardware and philosophy, not the software in operation (for OpSec reasons 😉).
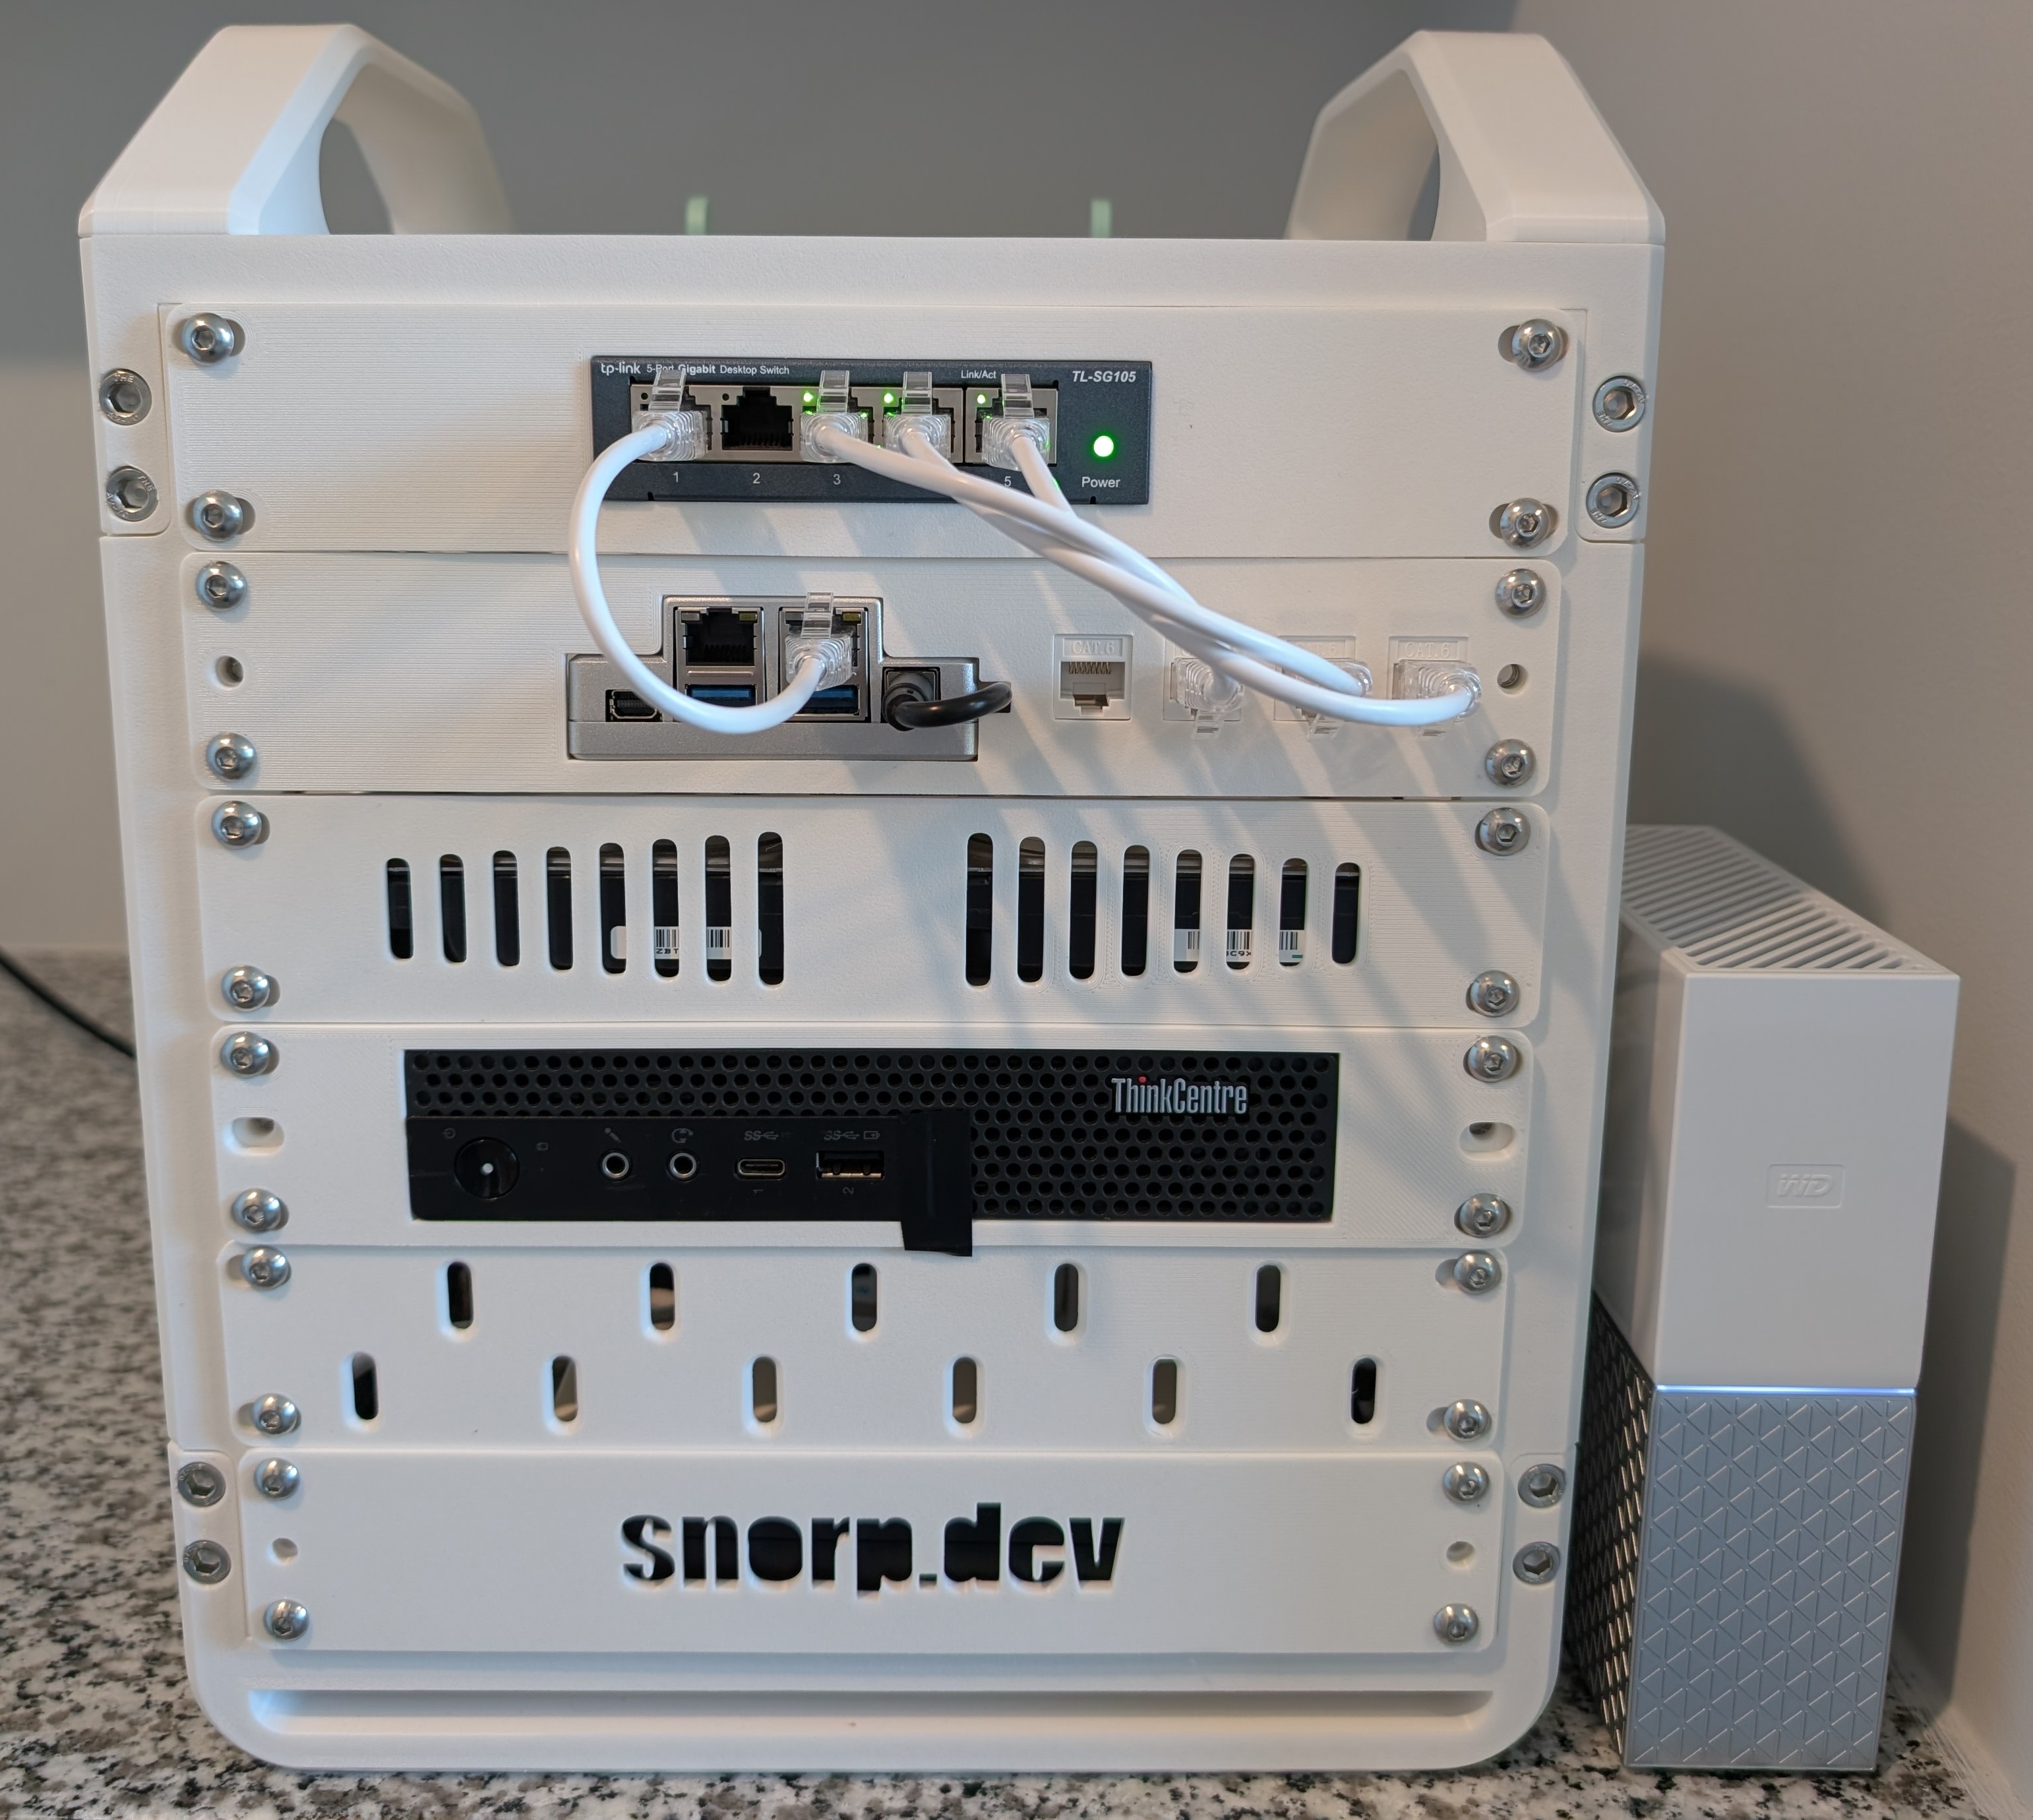
The Rack
There are three standard-ish server rack sizes. They are, in decreasing order of standardization, cost, and headache: 19-inch, 10-inch, 6-inch. I settled on the 10-inch format due to the project requirements, though I do wish I could have made a 6-inch rack work since enclosures would fit on a smaller print bed – then I wouldn’t have a strong need for a larger 3D printer.
3D-printing is an obvious choice for a 10-inch rack and a necessity for a 6-inch rack. Concerning my own decision, there were two main reasons:
- 10-inch racks specifically come at a price significantly higher than the cost of materials
- Commercial racks have a fixed size, either taking up excess space or having insufficient height
With 3D-printing a certainty, the next question was of materials. Most people in this space use PETG to balance accessibility, rigidity, and heat resistance. That was a non-starter here; ABS would be required for future high-performance projects. Printing ABS requires proper ventilation in order to avoid death (my own, that is). Naturally, I 3D-printed a solution.
As for the specific rack design, no need to model that myself. There are a few established printable 10-inch racks out there. I opted for the KWS Rack v.2 because it looks more elegant than the competition and because I have an interest in its success.
All the Hardware
I chose my hardware carefully to fit into as few rack units of height as possible, with consideration for models already designed and published online. We’ll work our way from the bottom up since that is how I envisioned the project. The version of the KWS Rack which I printed has 6U height. For explanatory purposes, we will call the bottom unit U1 and the top unit U6. The front of a given unit, UN, will be denoted UNF; the back UNB.
The "PDU"
Powering everything is an Anker 341 surge protector, chosen because it is almost exactly 1U in height and has outlets on the sides. It was important to me that I fit the surge protector inside the rack, as the many pictures I saw of people with large power bricks bolted on the back or simply on a surface next to the rack looked very inelegant. For both aesthetics and convenience, I demanded an entirely self-contained box that I could pick up and move at will. Thus, I settled on the Anker 341 and designed a custom enclosure in FreeCAD, with an additional inlet for an ethernet cable. This enclosure sits in U1B and contains the only two cables exiting the system (power and uplink). Consumer hardware was fine here because I do not require per-device power control.
In U1F is another custom-designed bracket for the Lenovo power brick connected to the device we will get to next. In order to be able to push the brick out, I needed some kind of hole at the front. This gave me the idea to implement free advertising by writing my name/URL on the front and cutting that out of the face plate. Now not only have I contained all power-related hardware in U1, I have done it in such a way that it increases my rate of collision with people who might provide some benefit to my career.
In U2B, at the very rear, is a rather large "wall wart" powering another device in the rack. U2F is intentionally left blank for a future project which should have enough clearance despite that obstruction. The panel I printed here has pegboard holes because it saves filament and is objectively more useful than a solid panel, even if I have no use for it right now.
The Server
U3 is populated by a Lenovo M720Q, a popular mini-PC with good performance for the price and strong community support in the form of 3D-printable enclosures. This runs the majority of my local services – we’ll leave it at that.
The NAS
My custom NAS build takes up 1.5U of space, with storage in U4 and compute in U5. Continuing in order, U4 contains a no-nonsense enclosure for two hard drives – Seagate IronWolf in my case, chosen for redundancy and reliability.
In U5 is another custom enclosure containing the Zimaboard 2, a PCIe to NVMe adapter with the boot drive, and four keystones serving as a patch panel. This all barely fits in 1U and I’m proud that I was able to squeeze everything in.
The general consensus is that the Zimaboard 2 is a horrible value and I concur, especially given the price increase since my purchase. I chose this product for my NAS specifically because it could fit in ½U with two SATA ports and non-eMMC boot, leaving space for that patch panel in the same row. Not a product I recommend if you have more space than that. A note on their included "SATA-Y Cable" – the device did successfully power all three drives with the stock power adapter, but the cable is too short to have the hard drives side by side, a major oversight. I had to purchase an extension which was both ugly and way too long to be elegant at 50cm.
The Western Digital network drive beside the rack is set to be decommissioned in favor of the multiple offsite backups I have prepared which exceed the requirements of the "3-2-1" philosophy and are beyond the scope of this article.
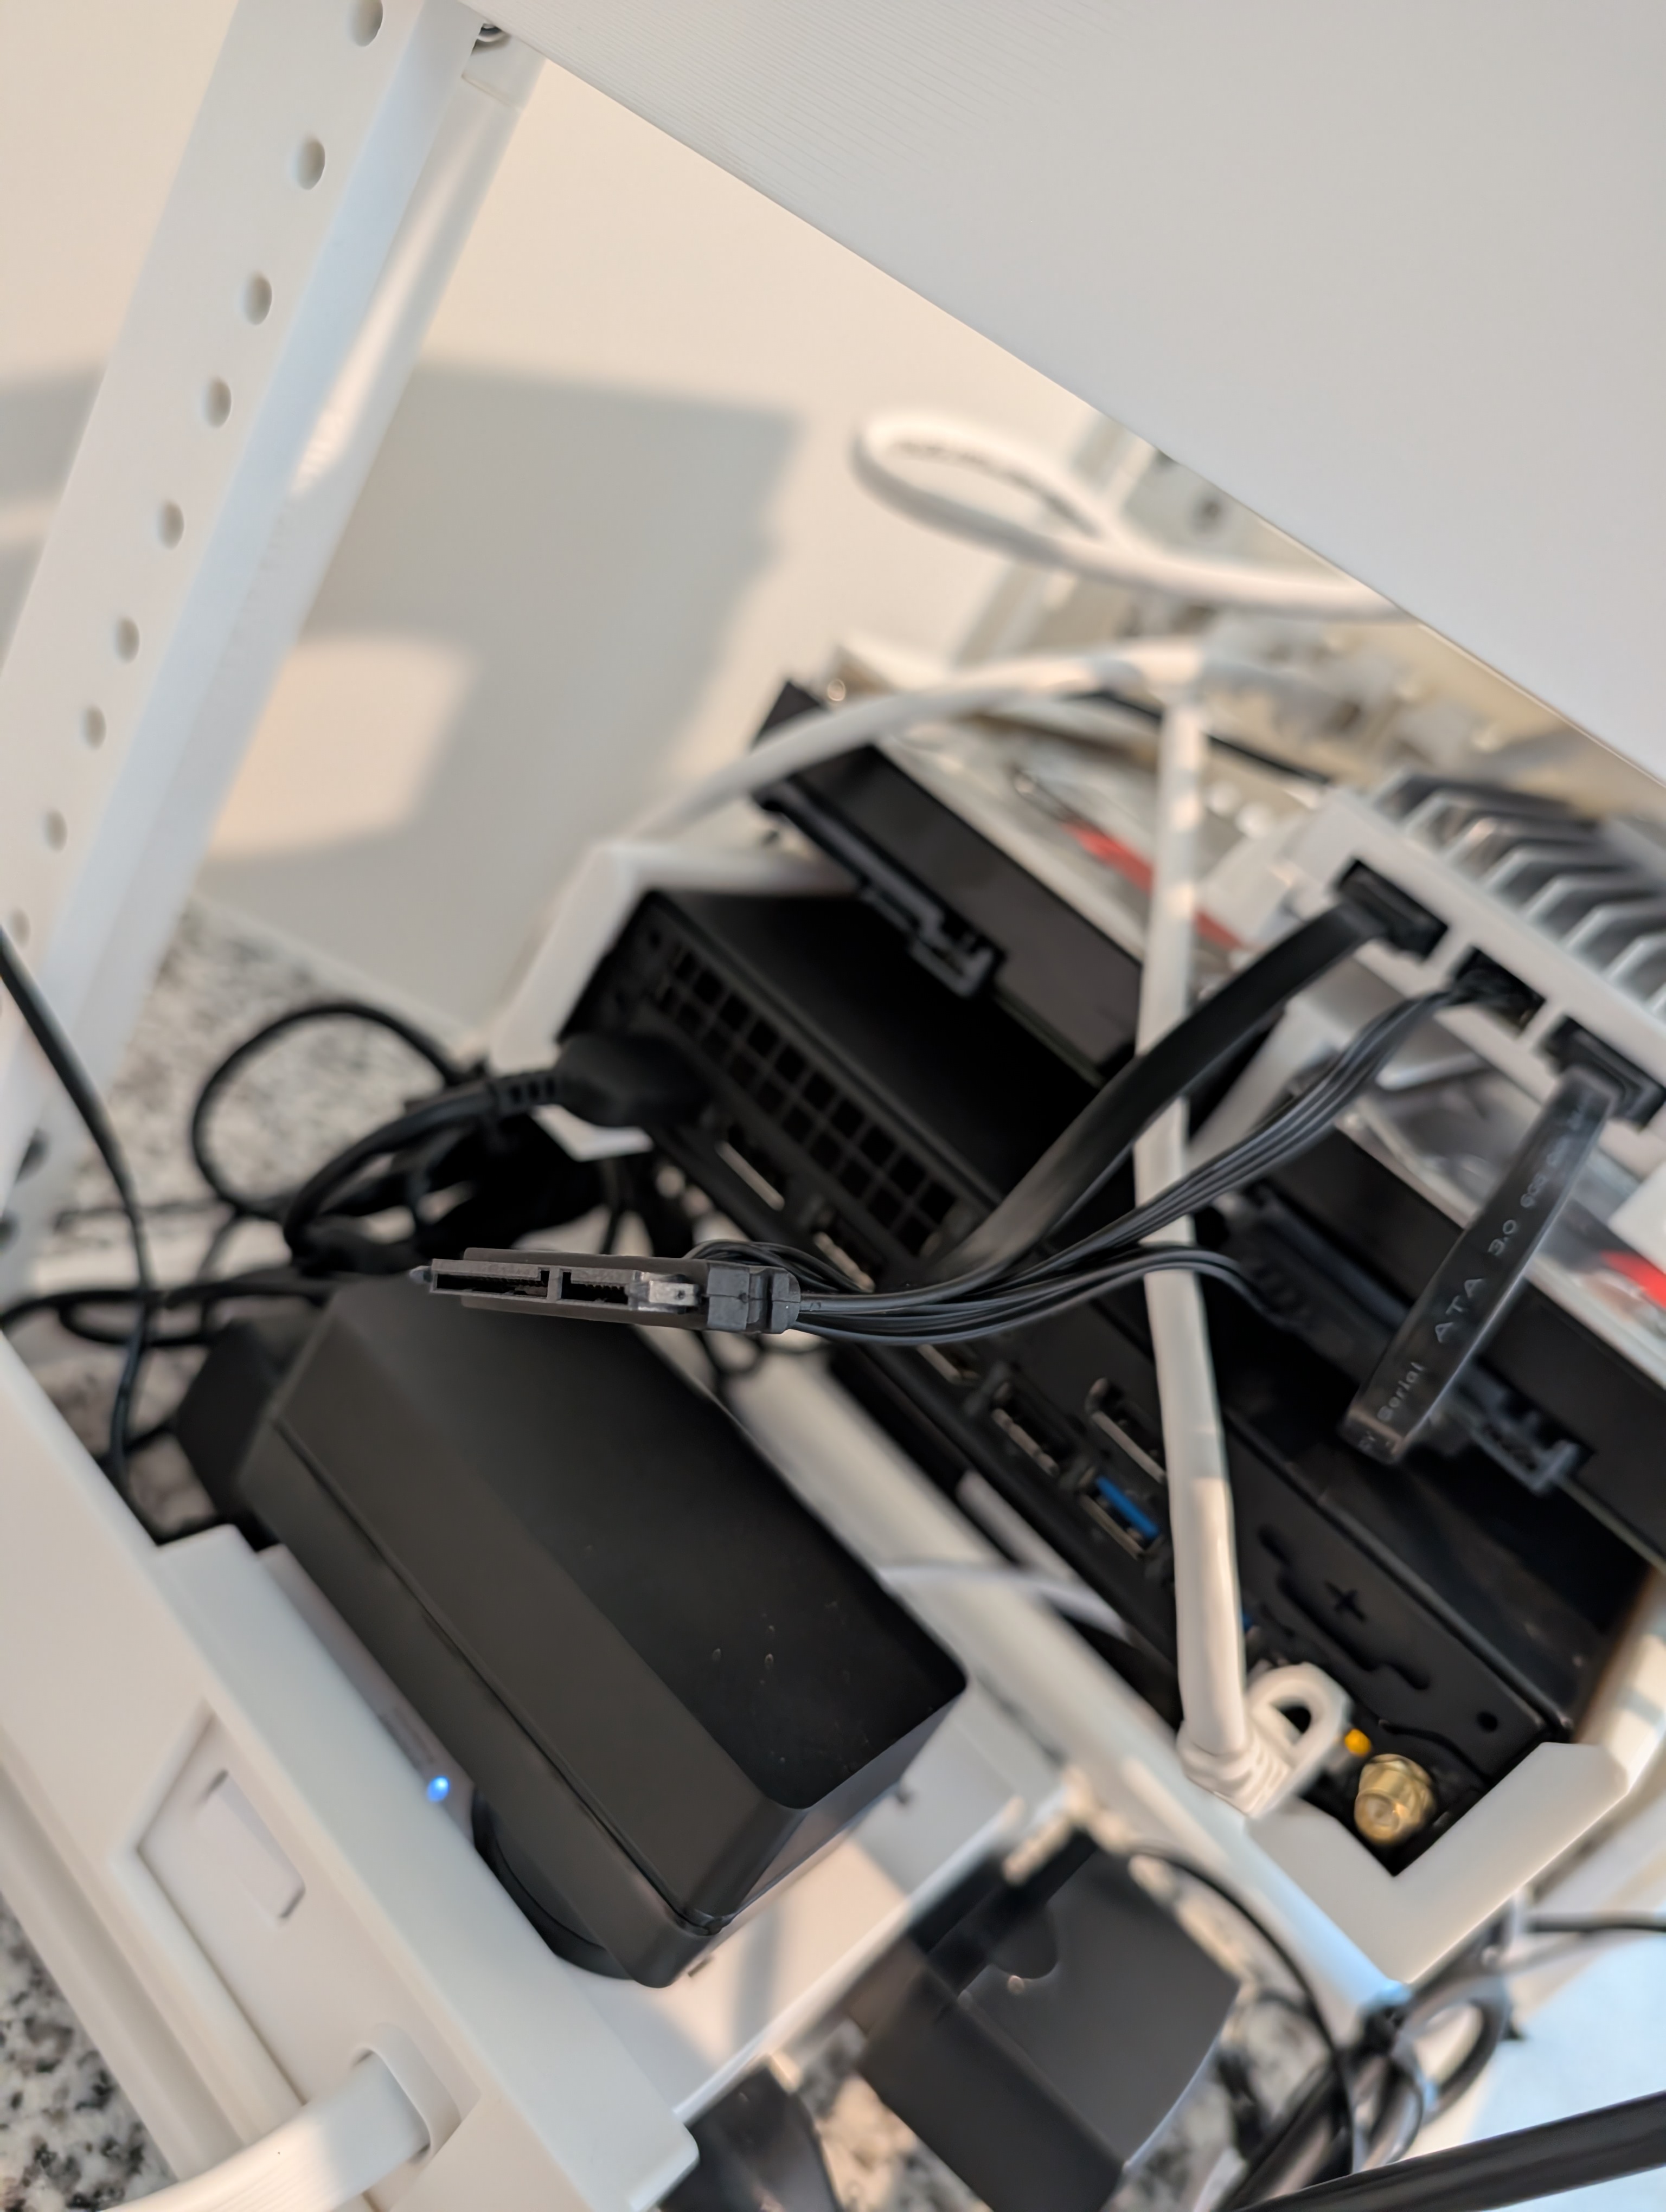
Networking
We’re at the top of the rack now.
In U6F is my switch, an unmanaged gigabit switch from TP-Link – nothing special.
In U6B is my router, a GL.inet Beryl 7 mini router. As with the Zimaboard, I only recommend it if space is a concern. Sketchy company, rocky security record, slightly cursed OpenWRT implementation for which I should eventually develop a fix. This device required another custom enclosure due to my required orientation, ports inward and antennae sticking up through the top panel (looks like it has bunny ears 👀).
Alternative Hardware Considered
NAS: Before coming across the Zimaboard 2, I thought I would go with a more standard ITX board for the NAS and have keystones in various locations on the rack to manage cables. This would have been a bit cheaper but required additional complexity, space, and weight. Given the modest difference in cost, I found the Zimaboard 2 to be a more elegant solution.
Server: I considered the LattePanda Sigma as an alternative to the M720Q. It could be purchased new for less than the cost of a new mini-PC and it would fit in half the space, but it would introduce additional cost and complexity while reducing reliability. Frankly it’s a worse deal than the Zimaboard products despite being more compelling in terms of hardware. I also considered getting multiple smaller single-board computers with more specialization instead of a single more powerful server, but that approach just did not work out in terms of cost, space, or elegance. Buying a commercial product, a used one at that, doesn’t feel great compared to a custom-built solution, but it was the only sensible choice here.
Power: Like many homelabbers, I fantasized about powering everything via POE++ or at least USB-C, but given the constraints and costs introduced by that requirement it was a non-starter. All power delivery fits within the rack as-is using standard NEMA 5-15 plugs, plus future projects will demand power beyond what can be delivered over an ethernet or USB cable.
The Future
A Homelab is never really done. There’s too much utility out there for any one tinkerer to implement it all.
The most obvious and accessible upgrade: 2.5G networking. TP-Link provides a 2.5G switch with the exact same dimensions as the gigabit switch currently in the rack, a perfect drop-in replacement. An intermediary step before an eventual custom-built 10G router and switch with a better security profile.
It all gets a lot more expensive from here. Next up is a LincStation N2 all-NVMe NAS. In the current market, this will come out to about $6,000 with four NVMe drives installed along with a 2.5-inch SATA SSD for boot. Why make such a stupid purchase? Size, noise, and format. Fits in 1U with room in the rear and eliminates hulking 3.5-inch hard drives which have moving parts and are inherently riskier to jostle around. The hard drives could then be used to upgrade an existing offsite backup or implement another one.
The patch panel is a non-issue. The M720Q enclosure I selected has a variant with two keystones and I could add two more on either side of the switch, offering equivalent capacity in less space.
Taking the 1U saved by switching to NVMe storage along with the 1U already left empty in the rack, we have just enough space for a small form factor gaming build starring the adorable RTX 5060 low profile GPU. 8GB is definitely not much VRAM in 2026, but I haven’t been looking to upgrade and performance is on par with my RTX 3070ti. More importantly, this would allow me to dispose of my larger desktop computer (it’s actually bigger than the entire 6U rack!), providing the real space-savings and end goal of the project. With this new PC built I would finally be able to isolate Windows on just this box and use my laptop for all other day-to-day tasks, potentially even eliminating my need for a dedicated desk (game streaming or direct connection to TV). A 4K-capable GPU would be wonderful but atrocious for thermals and physically impossible without expanding the rack.
At this point I’ll finally enclose the entire rack with mesh side and top panels, already uploaded online by the community, cementing the rack as a more permanently finished endeavor. The only other direct upgrade I can think of is per-device KVM but that’s more of a convenience than a feature providing any kind of new functionality.
The Point of it All
This all began because I ran out of space on my network drive and needed to build something better. Then the question became, "How can I consolidate my hardware in a more elegant way?" Then the project took on a deeper meaning.
I’ve had the displeasure of moving around a handful of times in my life. Each time I have more things and it’s more of a headache. The goal is less stuff, less attachment, less stress, and the ability to pack everything I own in my car and leave – without sacrificing on functionality.
You could say it’s the positive corollary to the dystopian "You will own nothing and be happy."